Friday, May 27, 2011

Rhubarb cinnamon polenta cake

I am a huge fan of rhubarb and have been searching everywhere for a plant to root in my garden. (Okay, so I really haven't looked EVERYWHERE, but I have asked at both local farmers markets and no luck. What more can honestly be expected of me?)

Last weekend, my moaning and whining about my rhubarb-free existence finally paid off and I was lucky enough to received some free rhubarb. I couldn't wait to dig in (pardon the pun), so I immediately turned to my new Nigel Slater book, Tender Vol. II, for his take on the sour stuff. The Brits seem to love rhubarb almost as much as I do, and use it in both savoury and sweet dishes. Of course, theirs sprouts up in February, which would be a welcome sight in any garden.

Anyway, this recipe uses cornmeal, or polenta, which gives the cake a crunchy texture that's rather nice.

I used the wrong sized tin for this, so it came out more tart like than cakey, but it's still good. It keeps well several days after baking, and manages to retain its tenderness too.

Get chopping!

Chop up 500g of rhubarb and place in a baking dish. Sprinkle with some sugar and a splash of water.

While that's baking, you get started on the crust, which comes together quite easily in a food processor. Press into a pan that's actually 20cm and you'll have better results than I did.


When the rhubarb's done cooking, you let it drain and cool for a bit in a colander, then spread it out over the crust.


And top it off with the leftover third of the crust and a sprinkling of turbinado sugar.


The end result looks like this. Slighty more cobbler looking than cake, but again, this would likely be rectified in a smaller pan. Though a bit flat-ish, the cake was remarkably moist.


Serve it with the reserved juices, which thicken once refrigerated. I'll definitely be making this one again, and so should you.

Rhubarb cinnamon polenta cake


From Nigel Slater's Tender Vol. II


Ingredients

For the filling:

500g rhubarb
50g golden caster sugar
4 tbsp water

For the crust:
125g coarse polenta *Nigel explicitly states that you're not to use the fine, sand-like cornmeal, but a coarser variety. I've never seem more than one grind for sale in Canada, so I used some pretty fine stuff and it wasn't a problem.
200g plain flour
1 tsp baking powder
a pinch of ground cinnamon
150g golden caster sugar
grated zest of a small orange
150g butter
1 large egg
2-4 tbsp milk
1 tbsp light muscovado sugar

Method

Preheat oven to 180C/gas mark 4.

1. Cut each rhubarb stem into two or three pieces and put them in a baking dish
2. Scatter over the sugar and water, and bake for 30-40 minutes until the rhubarb is soft but still retains its shape
3. Put the polenta, flour, baking powder, cinnamon and caster sugar in the bowl of a food processor. Add the grated zest and the butter, cut into smallish pieces, then blitz for a few seconds till you have something that resembles breadcrumbs
4. Beat egg and milk in a small bowl and add to the crumb mixture. Blitz until just combined
5. Press about two-thirds of the mixture into the cake tin, pushing it a couple of centimeters up the sides with a floured spoon
6. Place the rhubarb on top, leaving a small rim around the edge uncovered and cover with the remaining batter
7. Scatter over the light muscovado sugar
8. Bake on the hot baking sheet for 45 minutes
9. Leave to cool before removing from tin and serve with the juice left over from the rhubarb


Monday, May 23, 2011

Busy busy!

Where did that long weekend go? You'd think I would have plenty of time to update the old blog, what with three whole days off, but here it is on Sunday night and I'm scrambling to find something quick to post. I blame everything on the obscene number of dandelions I had to pull from my lawn.

More cooking and gardening stuff soon. In the meantime, here and here are two articles I recently wrote on girl power in the business world. Enjoy!

Sunday, May 15, 2011

Spinach and feta filo pie

I was lucky enough to get Jamie Oliver's new 30 Minute Meals book for Christmas, and at first, I wasn't too sure about the content. For one thing, the book is crowded and not particularly easy to navigate. All the recipes are presented in complete meals, with the idea that you set about to make everything all at once in a short period of time. Therefore, the instructions for all the receipes are combined together on one page, and he provides details on how to juggle back and forth between all dishes in order to get everything done on time.

Layout problems aside, when I actually sat down and started to read the book, I was intrigued by most of the recipes. As noted in this blog previously, I'm a big fan of Jamie's cooking and usually his food turns out very well.

I made this spinach and feta filo pie for the first time several weeks ago, and I've made it again since. It's pretty easy to put together, and really, really yummy. It's good the first night, right out of the oven, and just as good re-heated for leftovers on subsequent nights.

One minor quibble is that I only made this meal, and not the suggested side salads or dessert for this Greek-inspired meal, and it took me much longer than 30 minutes. Granted, I did not have the ingredients assembled beforehand, but cooking the spinach alone (in batches) takes 20 minutes. Perhaps 55 minute (plus) meals wouldn't be as catchy a title.

Speaking of spinach...
Here it is. The recipe calls for a whopping 400g, which is almost an entire giant spinach container you can buy from the grocery store. You have to cook it down in several batches, which is a bit tedious. But perservere with the knowledge that your iron levels will be off the charts because of your efforts.

While the spinach is wilting away, combine the eggs and cheese in a separate bowl.


Next up, prepare your filo dough and sprinkle with some cayenne for a bit of a kick.


Then add the filling to the filo.


Wrap everything up for its nap in the oven.

'Til it comes out looking like this!


Cut yourself a gooey piece and imagine you're in Mykonos by the sea.

Spinach and feta filo pie

From Jamie Oliver's 30 Minute Meals


100g (3½oz) pinenuts *I used walnuts, because I didn't want to re-mortgage my house to buy pinenuts
5 free range or organic eggs
300g (10½oz) feta cheese
50g (1¾oz)
Cheddar cheese
Dried oregano
1 lemon
A knob of butter
400g (14oz) prewashed baby spinach

1 x 270g pack of filo pastry

Cayenne pepper
1 whole nutmeg

TO START: Get all your ingredients and equipment ready. Turn the oven on to 200C/ gas 6. Put a medium (approx 26cm/10½in diameter) ovenproof frying pan on a medium heat. Put the standard blade attachment in the food processor.

SPINACH & FETA PIE: Put the pinenuts into the dry ovenproof frying pan to toast, tossing occasionally. Keep an eye on them. Crack 5 eggs into a mixing bowl and crumble in 300g (10½oz) feta. Grate in the Cheddar.

Add a pinch of pepper, a couple of pinches of dried oregano, zest of 1 lemon and a glug of olive oil. Once the nuts are light golden, add them to the egg mixture and mix well.

Put the empty frying pan back on the heat, add a little olive oil and a knob of butter and pile in half of the spinach. Gently push and move it around and add more as it wilts down. Make sure it doesn't catch on the bottom and, when there's room, start adding the rest, stirring frequently.
Meanwhile, take the pastry out of the fridge.

Lay a large sheet of greaseproof paper, approx 50cm (20in) long, on the worktop, rub a little olive oil all over it, then scrunch it up and lay it out flat again. Arrange 4 filo pastry sheets in a large rectangle, overlapping at the edges, so they almost cover the paper. Rub some olive oil over them. Sprinkle over a good pinch of salt and pepper and a pinch of cayenne. Repeat until you have 3 layers. Don't worry about any cracked bits. Remember to keep stirring the spinach.

Once the spinach is really nice and dense, take the pan off the heat. Add the wilted spinach to the egg mixture and grate in ½ a nutmeg. Mix well. Carefully move the greaseproof paper and filo into the empty frying pan so the edges spill over. Push it down into the sides of the pan, then pour in the egg mixture and spread it out. Fold the filo sheets over the top and let them fall where they will (for more help go to www. jamieoliver.com/how-to-filo-pie).

Put the pan back on a medium heat for a couple of minutes to get the bottom cooking, then put the pan into the oven on the top shelf to cook for 18 to 20 minutes, or until golden and crisp.

Sunday, May 8, 2011

Chicago

Last weekend I took off to Chicago. You know, to hang with Oprah and Obama for a few days. It's how I roll.

Chicago's a great city, and really easy to get to from Ottawa (with a minor stop in Toronto via Porter). The weather was fantastic and it was full on spring in the windy city.

The flowers were in perfect bloom along the Magnificent Mile. Purple hyacinths!


And you can't escape the architecture -- it's pretty much everywhere.


The views are great from the street or the river.


The El train (short for elevated). I didn't know that until this trip.


The Tribune building, where probaby three or four journalists are still at work.


It was a windy day for a walk along the lake.


Lots of public art throughout the city too.


But really, we were there to eat. I was too embarrassed to take may photos in restaurants, but we had amazing Mexican food (and a tangerine mojito) here, we saw Oprah's chef and ate catfish here.


We had a really creative meal at Graham Elliot, where I snuck this photo (complete with invasive flash) of my stater, which was an unconstructed Caesar salad. It featured tiny segments of lettuce, rolled in parmesan and topped with an anchovie. The rectangular bit at the bottom of the plate was a cheesy twinkie, filled with garlicky cream. So good.


And we went out of our way to go to Blackbird, where the food was great, and the clientele super stylish. I captured a photo of the finale to the meal, which featured parsnip ice cream. Really!


And the best ending to the trip was running into Tommy Smythe (from Sarah's House) in the elevator at our hotel! That's the second time I've met him, so I think that qualifies us to be BFFs, and he'll certainly be redecorating my house very soon.

Wednesday, April 27, 2011

Roasted shoulder of lamb for Easter

I hosted my parents for Easter this year, and in between doing several chores around the house (thanks, Dad!) and avoiding some nasty winter-ish weather, we ate pretty well.

I had in my mind that I wanted to serve up lamb for Sunday dinner, and naturally went first to Jamie Oliver to see what he suggested. I landed on his recipe for roasted shoulder of lamb, and immediately started to drool over his descriptions of flavourful meat that fell off the bone after four hours in a low oven. I happened to catch an episode of Jamie at Home earlier in the week, and we watched it on Friday evening, our mouths watering as Jamie demonstrated how an economical cut of meat (his term) could be transformed with slow, even cooking. We were sold and a menu of lamb was set.

Then came the difficult task of actually finding a lamb shoulder to cook. No luck at Farm Boy, or a butcher shop in the market. I asked my mum to try the butcher's in Lakefield (who were open on Good Friday -- heathens!), and nothing there either. Same result at Ralph's butcher shop in Norwood too.

I was worried we might have to resort to a lamb leg and admit defeat.

But I decided to give one last try on Saturday morning and we hit the jackpot at a very busy Glebe Meat Market. There were several shoulders to choose from, and the butcher offered to slice and dice it any way we wanted. We ended up with about a five pound roast, mostly shoulder with a few ribs attached. Off to the cash register where I forked over $36 for our little beauty. What was that you said about an economical cut, Jamie?? I supposed if you're a gazillionaire like our friend the Naked Chef, this isn't much money to spend on dinner. And it was a treat, I told myself, while silently cursing the lamb and muttering he'd better be worth it.

And worth it he (she?) was! This lamb was probably the most delicious I've ever had, if I do say so modestly and unashamedly. The best part is that's it was super simple to prepare with incredibly outstanding results.


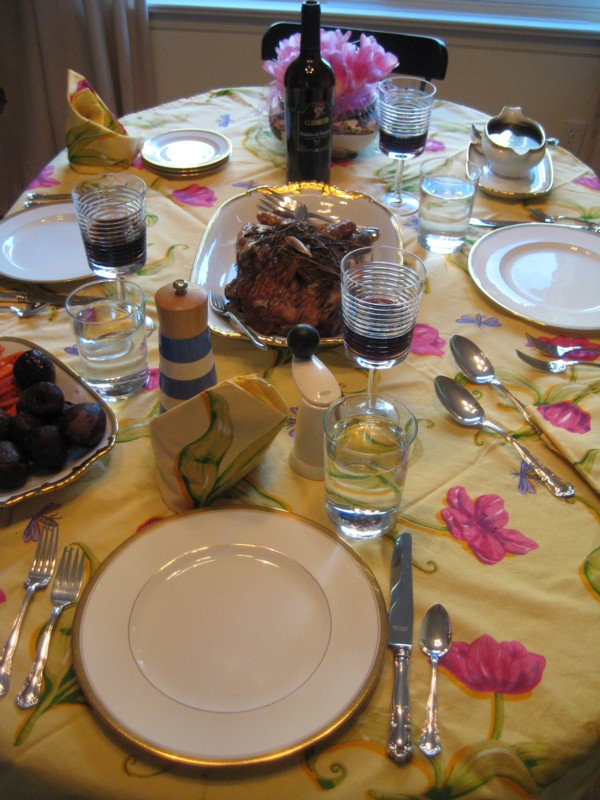
Here's the roast before it went in the oven, covered in rosemary and garlic and lying in my new roasting pan, that I christened for the event. The pan was so massive that it didn't quite fit in my teeny tiny oven, and had to go in on an angle in order for the door to close.

And about four hours later, it came out looking like this. The bones fell right out and we could pull apart the meat with forks. So, so good.

Here's what the table looked like with good china and cutlery. Not baa-ad for a holiday meal, huh?

Increcible roasted shoulder of lamb
From Jamie at Home

• a large bunch of fresh rosemary
• 1 x 2kg shoulder of lamb
• olive oil
• sea salt and freshly ground black pepper
• 1 bulb of garlic, unpeeled, broken into cloves

Preheat your oven to full whack. Slash the fat side of the lamb all over with a sharp knife. Lay half the sprigs of rosemary and half the garlic cloves on the bottom of a high-sided roasting tray, rub the lamb all over with olive oil and season with salt and pepper. Place it in the tray on top of the rosemary and garlic, and put the rest of the rosemary and garlic on top of the lamb. Tightly cover the tray with tinfoil and place in the oven. Turn the oven down immediately to 170°C/325°F/gas 3 and cook for 4 hours – it’s done if you can pull the meat apart easily with two forks.

Thursday, April 14, 2011

Baked kale chips

Back in the dark ages when I earned my keep as a babysitter, I used to sit for one family who were more than a bit on the crunchy granoloa side of things. On my first night on the job, I had the typical tour of the house and learned about emergency phone protocols, bedtime routines and the like. When the tour landed in the kitchen, the mom turned the discussion to snacks.

"The kids can have some chips and juice before bed," she said, pulling a box of corn flakes from the cupboard. "The juice is in the fridge and the cups are above the sink."

"Great," I said. "And where are the chips?"

"Here," she said, pointing to the corn flakes. "We put them in a bowl and tell the kids they're chips. Clever, huh?"

Seriously? I was so flabbergasted I wasn't quite sure what to say, but I knew for sure those kids were getting a raw deal. I completely understand not wanting to feed your kids chips, but if that's how you feel, then don't sugar coat -- or in this case, corn coat -- the situation and pass off one food for another. What about popcorn as a snack? It's not that unhealthy, and at least it's a legitimate snack food and not a breakfast cereal posing as a latenight treat. Can you imagine how peeved those kids must have been when they actually experienced real chips for the first time? Talk about setting up your children not to trust you about anything!

I was reminded of that chip anecdote when I made these kale chips last week. If you read food blogs as I do, then you'll know that baked kale was all the foodie rage a while ago. Everyone was raving about its greatness, and it turns out, it was warranted praise. These chips really do bake into crisp, salty chips that you feel almost guilty snacking on. Now you're never going to be fooled into thinking they're potato chips, but with the crispy texture and salty kick, they are quite tasty. Think more of a seaweedy flavour rather than starch (and I mean that in a good way). Apart from the salt and a trace amount of oil, these chips are good for you too. Why not get some vitamin A and C the next time you snuggle in to watch a movie and fancy a snack?


Here's how the chips look pre-baking, all glisteny with oily goodness. I think you could experiment with different flavoured oils for a slightly different taste.

And after a while in the oven, they come out dehydrated and super crisp. Perhaps not the most attractive snack food you've ever seen, but believe me, they are good. And the bonus is they stayed crispy, covered and uncovered, for several days after they were baked. The chips are pretty fragile once they're baked, so you have to handle them delicately. One recipe I saw suggested crunching up the chips and adding to popcorn. It's a total doubling up of snack foods, but what's wrong with that?


Baked Kale Chips
Adapted from a bunch of inspiring places and found here

1 bunch (about 6 ounces) kale (I used curly kale, but any kind will do. Apparently chard and other greens work well too.)
1 tablespoon olive oil (or enough to coat your leaves lightly)
Sea salt, to taste

Preheat oven to 300°F. Rinse and dry the kale, then remove the stems and tough center ribs. Cut into large pieces, toss with olive oil in a bowl then sprinkle with salt. Arrange leaves in a single layer on a large baking sheet, lined with parchment paper. Bake for 20 minutes, or until crisp. Place baking sheet on a rack to cool.

Sunday, April 3, 2011

Chickpea burgers

It's almost barbecue season! This weekend was the first real spring-like taste we've had so far in 2011. The snow is slowly retreating from my backyard, revealing some pretty nasty looking grass. I hope the lawn elves come by soon to rake everything up. But since it'll be several weeks before I actually haul my barbecue out of the garage and fire it up, I thought I would give these burgers a try. In truth, I wanted to make something with chickpeas again and this seemed like a nice compromise. As far as veggie burgers go, these ones are okay, but didn't knock my socks off. They're nicely spiced, but if I were to make them again, I'd increse the amount of spices and garlic. I also found them a bit too sweet with the carrot and red pepper. Maybe a little grated horseradish would provide a much-needed kick? Anyway, start by blending up the chickpeas, pepper and carrots in the food processor. You'll likely have to scrape down the sides several times to get everything the same consistency.
Blend until you end up with something like this. The result was much redder than I had anticipated, due to the pepper and carrot.
Then scrape the puree into a bowl and add in the oninons you sauteed earlier. The recipe says specifically not to brown them, so kindly ignore the brown flecks on mine. Note the spices in the right hand corner. Also, I didn't have bread crumbs, so I substituted in oats, the quick cooking kind. Oh, and you'll have to imagine half a cup of parsley, because I didn't have any of that either.
Shape into patties and set to bake on a pan drizzled with olive oil. The recipe says to make 10-12 patties, but I settled on seven. If you did go for a dozen, the burgers would be more slider size than a regular patty.
And here's what the final product looks like. I had to cook them a bit longer than stated, and I flipped them over part way through to get even browning on both sides. I didn't eat these burger style (e.g. on a bun with fixings) but you definitely could. For the leftovers, I'm going to whip up some kind of yogurt sauce for these. They need a little "something".
Chickpea burgers Adapted from The Three Greek Sisters and as seen on Cityline Preheat oven to 400F Makes 10-12 patties 2 tssp olive oil 1 yellow onion, diced 2 cups chickpeas, cooked 1 red pepper, deseeded and quartered 2 cloves garlic, sliced 1 carrot, chopped 1 1/4 cups fresh breadcrumbs 1 tsp salt 1/2 tsp cumin, group 1/4 tsp corriander, ground 1/2 cup fresh parsley, minced olive oil for coating 1) Heat the olive oil in a small sauté pan over medium heat. Add the onions and sauté until soft, about 5 minutes. Transfer to a large bowl and let cool. 2) Place the chickpeas, red pepper, garlic, and carrot in a food processor and pulse until all of the ingredients are blended. Transfer to the large bowl with the onions. Add the remaining ingredients to the bowl and use your hands to combine the ingredients. 3) Shape the mixture into patties and use a brush to lightly grease both sides of the patties with olive oil. 4) Transfer the patties to a baking sheet and place in the middle of a preheated oven for 20 minutes or until the patties are golden-brown on both sides. 5) Use a spatula to remove the patties from the baking sheet. Serve on a bun with your favourite garnishes: pickles, tomatoes, lettuce, red onions, the possibilities are endless! NOTE … The chickpea mixture can be prepared on the morning of serving day and stored in the refrigerator until ready to shape into patties.