Sunday, March 24, 2013

Maple olive oil banana bread

This weekend marked the end of Vanier's Maple Sugar Festival that takes place in one of North America's only urban sugar bushes. How cool is it that just a few blocks from my house, maple trees are tapped and real maple syrup is made? Just another reason Vanier's such an interesting place to live.

The festival inspired me to make this banana bread that uses maple syrup. While the syrup is a neat addition, so is the olive oil that makes this bread really moist. And the cinnamon sugar topping adds a nice crunch to each slice. Plus, with some whole wheat flour and Greek yogurt, it almost passes for a health food.

Really, what's not to like?
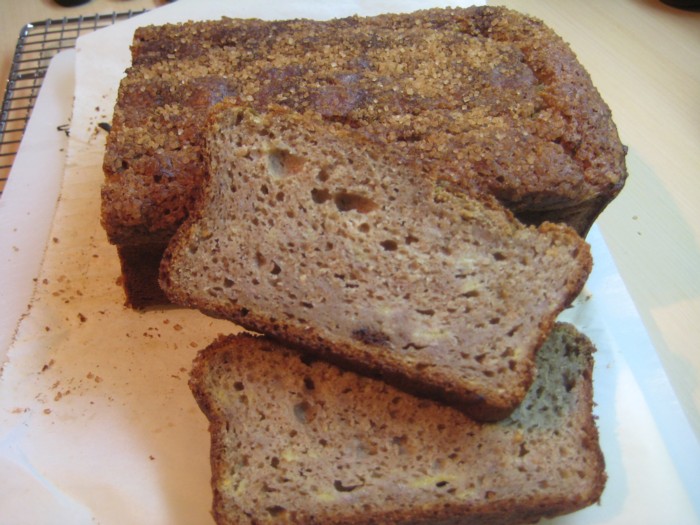

Maple olive oil banana bread
From Shutterbean
  • 1 cup all-purpose flour
  • 1/2 cup whole wheat flour
  • 1 teaspoon baking soda
  • 1 teaspoon salt
  • 1/4 teaspoon ground cinnamon
  • 1/8 teaspoon ground ginger
  • 1/2 cup olive oil
  • 1/2 cup brown sugar, packed
  • 1/4 cup maple syrup
  • 1 1/2 teaspoons pure vanilla extract
  • 2 eggs
  • 3 ripe bananas, mashed (about 1 cup puree)
  • 1/2 cup Greek yogurt
for the topping:
  • 2 tablespoons turbinado sugar
  • 1/2 teaspoon ground cinnamon
Preheat oven to 350F. Butter an 8 x 4 inch loaf pan. Line pan with a sling of parchment paper, with the long sides overhanging. Lightly butter the parchment, then set the pan aside.

Whisk together the flours, baking soda, salt and spices in a medium bowl. Set aside.

In a large bowl, whisk together the olive oil and brown sugar, breaking up any lumps. Add the maple syrup and vanilla, whisking until smooth. Add the eggs, one at a time and beat until fully incorporated. With a wooden spoon, stir in the bananas, then Greek yogurt. Add the flour mixture to the liquids, stirring until just combined. Do not over mix. Pour batter into prepared pan, evening out the top if necessary.

Mix together the turbinado sugar and cinnamon. Sprinkle the topping liberally over the batter and baked until a cake tester inserted in the middle of the loaf comes out clean, about 60-70 minutes.

Remove from the oven, and leave the bread to cool in its pan for 10 minutes. Using the parchment sling, life the bread out of the pan, unwrap and allow to cool completely on a wire rack.

Monday, March 18, 2013

St Lucia -- Part I

As we're on the eve of yet another snowstorm, I thought I needed to reminise about someplace warm. Someplace without snow and ice. Someplace that doesn't require boots. Or puffy coats. Or mitts.
 
At the end of February, I went to St Lucia for a week. And it was fabulous.
 
We stayed at the BodyHoliday, which is outside of the capital of Castries, and almost at the northen tip of the island.
 
But before I tell you how spectacular it was, let me tell you how we got there.
 
We took a HELICOPTER!!!!!!
 
Okay, not all the way from Ottawa. But from the international airport, which is in the south of the island. There were five other passengers and a British pilot. It was SUCH a weird feeling being in an actual helicopter. We just lighted up into the air -- almost like a hummingbird.

 
This was my view out the front of the chopper. We all had headphones so we could hear the pilot and each other.

 
We saw lots of coast line.

 
And some buildings too. Mostly we saw lots and lots of hills and green.

 
The trip took only about 12 minutes. This was our helicopter, with folks getting onboard for the return trip to the airport. We landed about 30 minutes from our hotel, so we had to hop in a cab. We arrived on St Lucian Independence Day, a national holiday, so traffic was light.

 
And soon enough, we were at the resort -- and the beach! This was worth the trip for sure.


Here's a view from the opposite side of the beach, looking up at our room block. Yellow flag on the beach meant it was a bit rough. Red and black apparently meant jellyfish, which luckily, we didn't encounter.
 
 
We arrived about 4:30 p.m., but our bags couldn't come on the helicopter with us, so they came by shuttle. We were forced to sit in our balcony and watch the sun set. Tough life.

 
This was our room. Plain but comfy.

 
And the bathroom. I won't spend much time on the room, because we didn't spend a lot of time there.


Mostly we were here. On the beach. Check out that view.


Sometimes we looked at boats. And sometimes those boats pulled waterskiiers.


We did leave the beach to eat. This was the buffet. Very nice.


And we ate in here (I can't figure out how to tilt this photo).


Sometimes we left the beach for the pool. But not very often. Those beds you see above the pool were pretty comfortable though.


Or sometimes we wandered to the end of the boardwalk for a cappucino. (Again, you have to tilt your head to see this pic.)

 
And sometimes we wandered into the clubhouse for a G&T or Pimms at the bar.
 
Honestly I can't say enough about this resort. The guests were mostly Brits, which was great, and the British influence was definitely strong. From the afternoon tea, to a bar stocked with Pimm's, this place really appealed to the Anglophile in me.
 
And the staff were absolutely lovely, and went out of their way to make sure everyone enjoyed their stay. While we were first-timers, we met many people who had visited two, three, seven or more times. They must be doing something right to get that kind of repeat business.
 
We did actually leave this paradise of a place for a day to explore some of the island. I'll tell you more about that next time.


Monday, March 11, 2013

Coconut muffins

Judging by the melting snow on both my driveway and my roof, spring is definitely on the way. I got the first whiff of it this weekend, when I was almost tempted to break out the shoes and lighter coat.

It's not quite tropical weather just yet, though, so all the more reason to enjoy some Carribean flavour in the form of these coconut muffins. They get some nice flavour from coconut oil and flaked coconut, and you could even substitute the yogurt for some coconut milk to totally max out the taste.

But even with two kinds of coconut, these are delicious enough to tide you over to summer.


This is the first time I've ever used coconut oil, which is solid at room temperature (think good ol' Crisco for comparison). And when you're not baking with it, coconut oil does double duty as a beauty tool, and a star ingredient in this beachy hair spray.


So it requires melting before you can use it in the recipe. Do you spot my new gas stove in this picture? It's so great, even if it's a little less than clean in this shot.


Here are the muffins headed for the oven. This recipe makes 10 small-medium sized muffins. I used parchment paper liners here, which are an awesome find. Not even a crumb wasted!


And here they are finished, complete with toasted tops. I froze most of these and they were just as good from the freezer as they were fresh. Always a good and practical sign in a muffin.
 
Double Coconut Muffins
From Smitten Kitchen

Yield: 10 standard muffins

1/2 cup (110 grams) virgin coconut oil
3/4 cup (95 grams) all-purpose flour
1/2 cup (60 grams) whole wheat flour
1 1/2 teaspoons baking powder
1/4 teaspoon table salt
1 cup (230 grams) full fat Greek-style yogurt, at room temperature is best
1/3 cup (65 grams) granulated sugar
1 large egg, at room temperature is best
1 teaspoon (5 ml) vanilla extract
3/4 cup (90 grams) sweetened shredded coconut, divided

Preheat oven to 375°F. Either grease 10 muffin cups with butter or coconut oil, or line them with papers.

In a small saucepan, warm your coconut oil just until it melts. It should still be on the cool side. (The egg and yogurt should also be at room temperature to avoid re-solidifying the oil.)

In a medium bowl, whisk together your flours, baking powder and salt. Stir 1/2 cup shredded coconut. In a separate bowl, whisk together egg, sugar, coconut oil, yogurt and vanilla. Stir into dry ingredients until just combined. Divide batter among prepared muffin cups then sprinkle the top with remaining 1/4 cup coconut, about 1 to 2 teaspoons on each.

Bake until a tester inserted into the center comes out batter-free, about 20 minutes. Transfer muffins to a rack and let cool.

Monday, February 4, 2013

C-c-c-c-c-old enough for you baked oatmeal (with pumpkin)

It's no fun getting out of your toasty bed when the temperature outside is barely hovering above minus 25. Even my car's grumpy on mornings like that.

But what makes the cold somewhat more tolerable is a warm breakfast to start your day. The great thing about this recipe is that it cooks away in your crockpot WHILE YOU SLEEP. That's right -- cooking while you snooze. What could be more efficient?


Pumpkin and oatmeal may sound like an odd combination, but with it's nice mix that means you'll be getting a serving of veggies and extra fibre in your morning meal. The addition of cinnamon, clove and nutmeg turn this into a warm-spice concoction that will make your kitchen smell like you've made a pumpkin pie.
 

If you spend a bit of time compiling the ingredients before you hit the hay, you'll wake to a hot and hearty meal in the morning. All you have to do is make some coffee, and maybe sprinkle some walnuts and cranberries on top of your bowl o' oats.

Baked Pumpkin Steel Cut Oatmeal
From The Kitchn
serves 4 to 6

2 tablespoons unsalted butter, divided
1 1/2 cups steel cut oats
1 cup pumpkin or squash puree
1/3 cup brown sugar
1 teaspoon cinnamon
1 teaspoon ginger
1/2 teaspoon cloves
1/4 teaspoon nutmeg
2 cups milk
2 1/2 cups warm water
1 teaspoon vanilla
1/2 teaspoon salt

Heat the oven to 375°F. In a 3-quart (or larger) saucepan or Dutch oven, heat 1 tablespoon of the butter over medium-high heat. (Your burner shouldn't be on at full blast, but the butter should melt quickly.) When the butter foams up, stir in the oats and fry them, stirring frequently, for about 3 minutes or until they smell toasted.

Push the oats up against the side of the pan, and drop the second tablespoon of butter in the now clear center of the pan. Dump in the pumpkin puree. Fry it in the butter, only stirring after about a minute. Stir in the sugar and spices and continue frying the puree for another 3 to 4 minutes, or until the color darkens slightly and the raw smell disappears. It's OK if a few dark brown spots appear as the puree sticks to the pan.

Pour in the milk and whisk everything to combine. Whisk in the water, vanilla and salt. Put a lid on the pan and put it in the oven. Bake for 35 minutes. Take the pan out of the oven, and carefully lift the lid (be cautious as steam will billow out). Stir the oatmeal. It will look quite loose still, but the oats should be al dente and tender. The oatmeal will thicken rapidly as it cools.

Eat immediately with a drizzle of cream or milk and maple syrup, or let cool and then refrigerate. Heat up bowls in the microwave or on the stovetop.

Slow Cooker Method: Follow the stovetop steps, then transfer the toasted oats and pumpkin to a slow cooker -- make sure you grease the insert with cooking spray to make cleanup easier. Whisk in the milk, water, vanilla, and salt, cook on LOW for 8 hours or overnight.

Tips:
  • Be sure to buy just canned pumpkin and not canned pumpkin pie filling for this recipe. I dumped the extra pumpkin into bags and poppped them in my freezer to use another time.
  • Even with the cooking spray, some of the oatmeal stuck to the bottom of my slow cooker. The cooked on bits were still yummy, but a bit of elbow grease was needed to get the pot clean.
  • Add extra milk or water (1/2 to 1 cup) to the pot before cooking if you like a looser porridge.
  • My favourite steel cut oats are McCann's from Ireland, but they tend to be expensive and difficult to find. President's Choice sells their own steel but oats, but the grains come from the U.S.A. A trip to the dollar store a few weeks ago resulted in the discovery of some Quaker steel cut oats, grown in Canada and processed in Peterborough, Ontario. Yay!

Something for the inmates

I've neglected those of you reading from prison for far too long. So, here's a long overdue shoutout in the form of an article I wrote on reforms to the parole system.

Glimmer of hope?

http://researchworks.carleton.ca/2013/01/stay/

Tuesday, January 15, 2013

Books of 2012

I think I'm still in the new year window, so here are some of the titles I enjoyed last year.

Rachel Joyce

This book contains a character with the last name of Fry (the maiden name of my grandmother) and another with the first name of Queenie (same grandmother’s first name) so how could I not read this? I LOVED this book and in spite of the fact that it made me openly weep in one chapter, it is neither depressing nor sad. Highly recommended.

JoJo Moyes

I normally don’t like parallel storylines in books, but this one worked. The time-travelling story gripped me (okay, I read it on the beach so my mind wasn’t otherwise occupied) and it had a twist at the end I didn’t see coming. 

Ian Mortimer

If you’ve ever wondered how the button changed fashion, or how medieval homes were decorated, this is the book for you. A unique read, written in a humorous and engaging way – think Lonely Planet rather than stuffy textbook.

Tom Parker Bowles

Yes, this is Camilla’s son, and yes, he can write. In this book he sources out the finest dishes in regions across Britain, and introduces us to the colourful characters who have popularized some of the dishes made famous around the world.

The Accident
Linwood Barclay

Not exactly fine literature, but the plot keeps you interested, and the story moves along quickly. Plus, Peterborough boy represents!

One Last Thing Before I Go
Jonathan Tropper

What should be a less-than-likeable main character is fairly endearing in this story about a man trying to piece his family back together before he dies.

The Uninvited Guests
Sadie Jones

For fans of Downton Abbey and….the paranormal? Parts of the story are weird, but the dialogue and lush descriptions of the Edwardian house and fancy dinner parties make up for it.

Monday, December 31, 2012

Let it snow!

Merry belated Christmas everyone!

Before you comment on my previous promise of updating with holiday treats, let me tell you that my pre-festivity posting intentions were good. Sadly, a nasty cold has confined me to my couch for most of the last week, where I've been making friends with Kleenex and hot toddies. It's just as well really, considering this is what's happening outside.

 
Yes, that is snow piled on my garage roof. We've had quite the dump of the white stuff in the nation's capital over the past few days, so there has been lots of shovelling going on (though not by me, obviously, but by those who enjoy the pursuit, and by the service I employ).
 
All the more reason to tell you about something I did manage to make before I was struck down with the plague.
 
Clementine curd is a nice thing to have any time of the year, but especially so at Christmas, when the boxes are plentiful and if you're like me, you're looking for a way to use up the fruit before it goes bad.


So start by zesting six clementines and two lemons. Not that hard really.


Then juice away. Again, nothing too taxing so far.


Then all that juice is combined with the zest and some eggs and sugar in a pot over a low heat on the stove. As it warmed, in goes some butter to thicken it up. This step does take a while, but all that's required of you is to stand by the pot, stirring. It's fairly easy, compared some things, like working in a coal mine for instance.


At the end, all that hard work pays off in the form of some lovely citrusy curd that's perfect for spreading on toast, or scones, or anything else you might like. So go on, make yourself some while clementines are still around.

Clementine curd
From Jamie Magazine

Ingredients

• 6 clementines
• 2 lemons
• 350g caster sugar
• 4 eggs, beaten
• 2 egg yolks, beaten
• 100g unsalted butter, diced

Grate in the fruit zest and squeeze the juice into a saucepan with the sugar, eggs and yolks, and mix to combine. Add the butter and place over a very low heat. Cook, constantly stirring (you don’t want your eggs to scramble), until the curd is thick and coats the back of the spoon. Pour into sterilised jars, seal and refrigerate. Use within two weeks.

*I used only about 225 g of sugar and the result nicely tart curd. Recipe yielded three of the jars pictured above.

Sunday, December 16, 2012

Walnut and coffee cake


Remember me? If you're wondering where I've been, I've been working, molding young minds, giving palliative care to my car, hanging out in the waiting rooms of Toronto General's cardiac unit. You know -- the usual.

Somewhere in there I had a birthday. I made this cake from a Jaime Oliver recipe to mark the occasion. I had high expectations, but it wasn't as moist as I wanted it to be. It does have a nice coffee flavour though, if that's your thing.

Back soon with more seasonal recipes.

The best coffee and walnut cake
From Jamie Magazine

175g unsalted butter, cubed and softened, plus extra to grease
• 75g walnuts, plus a few extra to go on top
• 175g sugar
• 3 eggs, beaten
• 150g self-raising flour
• ½ tsp baking powder
• 50ml cold espresso

Coffee filling
• 65g butter, cubed and softened
• 125g icing sugar
• 40ml strong espresso

Coffee icing
• 100g icing sugar
• 20ml strong espresso

1. Preheat the oven to 180C/gas 4. Grease and line the bases of 2 round 20cm cake tins. In a food processor, blitz two-thirds of the nuts to powder. Cream the butter in a bowl with the sugar until light and fluffy. Gradually beat in the eggs then add the blitzed walnuts and gently stir through.
2. Fold the flour, baking powder and a pinch of salt through with a large metal spoon until just incorporated.
3. Roughly chop the rest of the walnuts and stir through the cake mixture along with the espresso. Evenly divide the mixture between the cake tins and bake in the oven for 20–25 minutes, until lightly golden and cooked through when tested with a skewer. Cool the cakes in the tins for 5 minutes, then transfer to a wire rack to cool completely.
4. For the filling, put the butter in a bowl. Sift in the icing sugar, beat until fluffy, then beat in the coffee.
5. For the icing, sift the icing sugar into a bowl and beat in the coffee to make a thick, smooth icing.
6. Place one of the cakes on a plate or board and spread with the coffee filling. Top with the second cake and drizzle over the icing. Decorate the cake with the remaining walnuts as they are, or lightly caramelised. To do this, melt sugar over a medium heat, without stirring, then carefully toss the nuts in briefly to coat. Cool the nuts on a wire rack before using.

Tuesday, October 16, 2012

Pasta with cauliflower and brussels sprouts

Are you eating a lot of beef these days? Me either! This recipe is a hearty veggie alternative. I've been eating it for the last few days, and I'm not tired of it yet. My favourite is the Pecorino cheese, which adds a nice tang to the dish.

Start by roasting up the sprouts and red onions. The cauliflower went on a separate sheet.

And here's the final dish, finished off with some of that yummy Pecorino. Dig in and get your veggie fix!

Rigatoni with roasted cauliflower and Brussels sprouts

serves 4
From Shutterbean
  • 3/4 pound rigatoni or some other short pasta
  • 1/2 medium head cauliflower (about 1 pound), cut into florets
  • 8 ounces Brussels sprouts, trimmed and halved (quartered if large)
  • 1 medium red onion, cut into 1/2-inch wedges
  • 2 sprigs fresh thyme
  • 4 tablespoons olive oil
  • kosher salt and black pepper
  • 2 ounces grated Pecorino (about 1/2 cup), plus more for serving
  • 1/2 lemon
Heat oven to 450° F. Cook the pasta according to the package directions. Reserve 1 cup of the cooking water; drain the pasta and return it to the pot.

Meanwhile, on 2 large rimmed baking sheets, toss the cauliflower, Brussels sprouts, and onion with the thyme, 2 tablespoons of the oil, and ½ teaspoon each salt and pepper. Roast, tossing the vegetables once and rotating the sheets halfway through, until golden brown and tender, 15 to 20 minutes.

Add the vegetables, Pecorino, ½ cup of the reserved cooking water, and the remaining 2 tablespoons of oil to the pasta and toss to combine (add more cooking water if the pasta seems dry). Squeeze half fresh lemon over pasta and stir. Serve sprinkled with additional Pecorino.

Monday, October 1, 2012

Say cheese

This past week I took a day off to learn how to make cheese. No, I'm not thinking of switching careers, but I did think the class would be interesting. And I was right.
 
The course was at Glengarry Fine Cheese, about an hour and a half southeast of Ottawa, just past a little town called Alexandria. (Lots of hilariously-named shops in Alexandria, including The Book Nook and Bite Me, a sandwich shop located next to the funeral home, which is, presumably, where one goes after you Bite It.) But I digress...
 
The drive was quite nice through farm country. I passed lots of corn fields.
 

This is what the workroom looked like. This is the cheddar station, obviously. Not pictured were the gouda and mozzarella station, and the camembert and feta station.

 
First task was to warm the milk (cow, whole and homogenized from a local dairy) to the appropriate temperature. Different cheeses require different temperatures, but most ranged between about 29-32C. The milk was inside a water bath to help keep the temperature regulated.


Then we added the starter, which got the whole process going, leaving us with curds that looked a bit like cottage cheese.
 
 
These curds got poured into moulds to become camembert.
 
 
Look at all that whey draining out.
 
 
And here are the mozzarella moulds draining.
 
  
Let's check on the cheddar. The milk solidified and turned jelly-like until we could cut it into cubes with a knife.
 
 
Next we continued to break down the curds with a whisk. I was in charge of this pot, which I turned into curds deemed unsatisfactory compared to the other pot. Curd making fail!
 
 
Here's the cheddar as actual curds. We pushed them through a Starfrit french fry cutter to get the shape. Once the salt is added, the curds twist up into that familiar shape. Squeaky goodness!
 
 
Break time. Lots of cheese varieties to sample.


Back to work. These are the mozzarella curds, waiting to be cut into smaller pieces, then dunked into hot water to be stretched. 

 
Stretch that cheese! The water was so so hot. This is also how cheese strings are made.
 

Pressing the gouda into a mould. I learned it's pronounced gow-da, not goo-da, so now you know too.
 

Getting rid of the whey. This whey goes to pigs on two nearby pig farms.
 

Last lesson of the day: waxing blocks of gouda to protect and prevent mould growth.


All in all, a fun and informative day. We divvied up all the cheese we make among the 12 students. I brought home a bag of curd, some feta cheese (currently brining in my fridge) and some camembert, which is now "ageing" in my basement. I need to babysit it for the next six weeks, checking for mould and then turning it every two days. So basically it'll be like having a kid, right? You all should take bets now on whether I'll forget about it altogether, only to discover a mouldy, smelly mess sometime next spring.

Happy cheese eating!
 

Sunday, September 16, 2012

Chicken, lemon and dill with orzo

Opa! Ottawa held its Greekfest a few weeks ago. I didn't go, but I celebrated at home with this dish. It's a nice alternative to tomato-based pasta bakes. And now that the weather's getting a bit cooler, it's nice to make something that actually requires the oven. This dish is pretty easy to put together, and it's a one-disher, which makes it even better.


All you have to do is assemble the ingredients. I used chicken breasts instead of chicken tenders, and fresh dill, but I think dried would work just as well. There's no need to pre-cook the pasta either, so it truly is a dump and dine kind of meal (I think I just coined that term, but it could use some work).
 
And here's what it looks like when it's baked.  Not the most beautiful plate, or photo, here, but I think I will make this one again.

Chicken, lemon and dill with orzo

 
Ingredients
  • 4 cups low-sodium chicken broth
  • 1 tablespoon unsalted butter
  • 1 1/4 teaspoons coarse salt
  • 1/4 teaspoon ground pepper
  • 1 pound chicken tenderloins, cut into 1-inch pieces
  • 1 pound orzo
  • 2 cups crumbled feta (4 ounces)
  • 1/4 cup coarsely chopped fresh dill
  • 2 teaspoons finely grated lemon zest, plus 1 tablespoon fresh lemon juice
  • 1 cup grated Parmesan
Directions
  1. Preheat oven to 400 degrees. In a saucepan, bring broth, 3/4 cup water, butter, salt, and pepper to a boil. In a 3-quart baking dish, combine chicken, orzo, feta, dill, lemon zest and juice. Pour broth mixture over orzo and stir once to incorporate. Bake until orzo is tender and cooking liquid is creamy, 40 minutes. Sprinkle Parmesan on top and let stand 5 minutes before serving.
 

Sunday, September 9, 2012

A pie for Canada


Two pie posts in a row?
 
This is the blueberry pie we made at the cottage over the Labour Day long weekend. Doesn't it look good? It was. Truly. We ate it on the eve of the Quebec election, which is fitting, since the pie was made with blueberries from Quebec and some from Ontario. They got along quite well together, and the pie wouldn't have been as good without that combiation.
 
Too bad Canadian politics isn't as simple.