Monday, December 31, 2012

Let it snow!

Merry belated Christmas everyone!

Before you comment on my previous promise of updating with holiday treats, let me tell you that my pre-festivity posting intentions were good. Sadly, a nasty cold has confined me to my couch for most of the last week, where I've been making friends with Kleenex and hot toddies. It's just as well really, considering this is what's happening outside.

 
Yes, that is snow piled on my garage roof. We've had quite the dump of the white stuff in the nation's capital over the past few days, so there has been lots of shovelling going on (though not by me, obviously, but by those who enjoy the pursuit, and by the service I employ).
 
All the more reason to tell you about something I did manage to make before I was struck down with the plague.
 
Clementine curd is a nice thing to have any time of the year, but especially so at Christmas, when the boxes are plentiful and if you're like me, you're looking for a way to use up the fruit before it goes bad.


So start by zesting six clementines and two lemons. Not that hard really.


Then juice away. Again, nothing too taxing so far.


Then all that juice is combined with the zest and some eggs and sugar in a pot over a low heat on the stove. As it warmed, in goes some butter to thicken it up. This step does take a while, but all that's required of you is to stand by the pot, stirring. It's fairly easy, compared some things, like working in a coal mine for instance.


At the end, all that hard work pays off in the form of some lovely citrusy curd that's perfect for spreading on toast, or scones, or anything else you might like. So go on, make yourself some while clementines are still around.

Clementine curd
From Jamie Magazine

Ingredients

• 6 clementines
• 2 lemons
• 350g caster sugar
• 4 eggs, beaten
• 2 egg yolks, beaten
• 100g unsalted butter, diced

Grate in the fruit zest and squeeze the juice into a saucepan with the sugar, eggs and yolks, and mix to combine. Add the butter and place over a very low heat. Cook, constantly stirring (you don’t want your eggs to scramble), until the curd is thick and coats the back of the spoon. Pour into sterilised jars, seal and refrigerate. Use within two weeks.

*I used only about 225 g of sugar and the result nicely tart curd. Recipe yielded three of the jars pictured above.

Sunday, December 16, 2012

Walnut and coffee cake


Remember me? If you're wondering where I've been, I've been working, molding young minds, giving palliative care to my car, hanging out in the waiting rooms of Toronto General's cardiac unit. You know -- the usual.

Somewhere in there I had a birthday. I made this cake from a Jaime Oliver recipe to mark the occasion. I had high expectations, but it wasn't as moist as I wanted it to be. It does have a nice coffee flavour though, if that's your thing.

Back soon with more seasonal recipes.

The best coffee and walnut cake
From Jamie Magazine

175g unsalted butter, cubed and softened, plus extra to grease
• 75g walnuts, plus a few extra to go on top
• 175g sugar
• 3 eggs, beaten
• 150g self-raising flour
• ½ tsp baking powder
• 50ml cold espresso

Coffee filling
• 65g butter, cubed and softened
• 125g icing sugar
• 40ml strong espresso

Coffee icing
• 100g icing sugar
• 20ml strong espresso

1. Preheat the oven to 180C/gas 4. Grease and line the bases of 2 round 20cm cake tins. In a food processor, blitz two-thirds of the nuts to powder. Cream the butter in a bowl with the sugar until light and fluffy. Gradually beat in the eggs then add the blitzed walnuts and gently stir through.
2. Fold the flour, baking powder and a pinch of salt through with a large metal spoon until just incorporated.
3. Roughly chop the rest of the walnuts and stir through the cake mixture along with the espresso. Evenly divide the mixture between the cake tins and bake in the oven for 20–25 minutes, until lightly golden and cooked through when tested with a skewer. Cool the cakes in the tins for 5 minutes, then transfer to a wire rack to cool completely.
4. For the filling, put the butter in a bowl. Sift in the icing sugar, beat until fluffy, then beat in the coffee.
5. For the icing, sift the icing sugar into a bowl and beat in the coffee to make a thick, smooth icing.
6. Place one of the cakes on a plate or board and spread with the coffee filling. Top with the second cake and drizzle over the icing. Decorate the cake with the remaining walnuts as they are, or lightly caramelised. To do this, melt sugar over a medium heat, without stirring, then carefully toss the nuts in briefly to coat. Cool the nuts on a wire rack before using.

Tuesday, October 16, 2012

Pasta with cauliflower and brussels sprouts

Are you eating a lot of beef these days? Me either! This recipe is a hearty veggie alternative. I've been eating it for the last few days, and I'm not tired of it yet. My favourite is the Pecorino cheese, which adds a nice tang to the dish.

Start by roasting up the sprouts and red onions. The cauliflower went on a separate sheet.

And here's the final dish, finished off with some of that yummy Pecorino. Dig in and get your veggie fix!

Rigatoni with roasted cauliflower and Brussels sprouts

serves 4
From Shutterbean
  • 3/4 pound rigatoni or some other short pasta
  • 1/2 medium head cauliflower (about 1 pound), cut into florets
  • 8 ounces Brussels sprouts, trimmed and halved (quartered if large)
  • 1 medium red onion, cut into 1/2-inch wedges
  • 2 sprigs fresh thyme
  • 4 tablespoons olive oil
  • kosher salt and black pepper
  • 2 ounces grated Pecorino (about 1/2 cup), plus more for serving
  • 1/2 lemon
Heat oven to 450° F. Cook the pasta according to the package directions. Reserve 1 cup of the cooking water; drain the pasta and return it to the pot.

Meanwhile, on 2 large rimmed baking sheets, toss the cauliflower, Brussels sprouts, and onion with the thyme, 2 tablespoons of the oil, and ½ teaspoon each salt and pepper. Roast, tossing the vegetables once and rotating the sheets halfway through, until golden brown and tender, 15 to 20 minutes.

Add the vegetables, Pecorino, ½ cup of the reserved cooking water, and the remaining 2 tablespoons of oil to the pasta and toss to combine (add more cooking water if the pasta seems dry). Squeeze half fresh lemon over pasta and stir. Serve sprinkled with additional Pecorino.

Monday, October 1, 2012

Say cheese

This past week I took a day off to learn how to make cheese. No, I'm not thinking of switching careers, but I did think the class would be interesting. And I was right.
 
The course was at Glengarry Fine Cheese, about an hour and a half southeast of Ottawa, just past a little town called Alexandria. (Lots of hilariously-named shops in Alexandria, including The Book Nook and Bite Me, a sandwich shop located next to the funeral home, which is, presumably, where one goes after you Bite It.) But I digress...
 
The drive was quite nice through farm country. I passed lots of corn fields.
 

This is what the workroom looked like. This is the cheddar station, obviously. Not pictured were the gouda and mozzarella station, and the camembert and feta station.

 
First task was to warm the milk (cow, whole and homogenized from a local dairy) to the appropriate temperature. Different cheeses require different temperatures, but most ranged between about 29-32C. The milk was inside a water bath to help keep the temperature regulated.


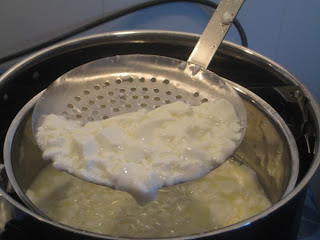
Then we added the starter, which got the whole process going, leaving us with curds that looked a bit like cottage cheese.
 
 
These curds got poured into moulds to become camembert.
 
 
Look at all that whey draining out.
 
 
And here are the mozzarella moulds draining.
 
  
Let's check on the cheddar. The milk solidified and turned jelly-like until we could cut it into cubes with a knife.
 
 
Next we continued to break down the curds with a whisk. I was in charge of this pot, which I turned into curds deemed unsatisfactory compared to the other pot. Curd making fail!
 
 
Here's the cheddar as actual curds. We pushed them through a Starfrit french fry cutter to get the shape. Once the salt is added, the curds twist up into that familiar shape. Squeaky goodness!
 
 
Break time. Lots of cheese varieties to sample.


Back to work. These are the mozzarella curds, waiting to be cut into smaller pieces, then dunked into hot water to be stretched. 

 
Stretch that cheese! The water was so so hot. This is also how cheese strings are made.
 

Pressing the gouda into a mould. I learned it's pronounced gow-da, not goo-da, so now you know too.
 

Getting rid of the whey. This whey goes to pigs on two nearby pig farms.
 

Last lesson of the day: waxing blocks of gouda to protect and prevent mould growth.


All in all, a fun and informative day. We divvied up all the cheese we make among the 12 students. I brought home a bag of curd, some feta cheese (currently brining in my fridge) and some camembert, which is now "ageing" in my basement. I need to babysit it for the next six weeks, checking for mould and then turning it every two days. So basically it'll be like having a kid, right? You all should take bets now on whether I'll forget about it altogether, only to discover a mouldy, smelly mess sometime next spring.

Happy cheese eating!
 

Sunday, September 16, 2012

Chicken, lemon and dill with orzo

Opa! Ottawa held its Greekfest a few weeks ago. I didn't go, but I celebrated at home with this dish. It's a nice alternative to tomato-based pasta bakes. And now that the weather's getting a bit cooler, it's nice to make something that actually requires the oven. This dish is pretty easy to put together, and it's a one-disher, which makes it even better.


All you have to do is assemble the ingredients. I used chicken breasts instead of chicken tenders, and fresh dill, but I think dried would work just as well. There's no need to pre-cook the pasta either, so it truly is a dump and dine kind of meal (I think I just coined that term, but it could use some work).
 
And here's what it looks like when it's baked.  Not the most beautiful plate, or photo, here, but I think I will make this one again.

Chicken, lemon and dill with orzo

 
Ingredients
  • 4 cups low-sodium chicken broth
  • 1 tablespoon unsalted butter
  • 1 1/4 teaspoons coarse salt
  • 1/4 teaspoon ground pepper
  • 1 pound chicken tenderloins, cut into 1-inch pieces
  • 1 pound orzo
  • 2 cups crumbled feta (4 ounces)
  • 1/4 cup coarsely chopped fresh dill
  • 2 teaspoons finely grated lemon zest, plus 1 tablespoon fresh lemon juice
  • 1 cup grated Parmesan
Directions
  1. Preheat oven to 400 degrees. In a saucepan, bring broth, 3/4 cup water, butter, salt, and pepper to a boil. In a 3-quart baking dish, combine chicken, orzo, feta, dill, lemon zest and juice. Pour broth mixture over orzo and stir once to incorporate. Bake until orzo is tender and cooking liquid is creamy, 40 minutes. Sprinkle Parmesan on top and let stand 5 minutes before serving.
 

Sunday, September 9, 2012

A pie for Canada


Two pie posts in a row?
 
This is the blueberry pie we made at the cottage over the Labour Day long weekend. Doesn't it look good? It was. Truly. We ate it on the eve of the Quebec election, which is fitting, since the pie was made with blueberries from Quebec and some from Ontario. They got along quite well together, and the pie wouldn't have been as good without that combiation.
 
Too bad Canadian politics isn't as simple.
 

Monday, August 27, 2012

Raspberry pie


The end of summer also means the end of raspberry season, which is a sad event indeed. I'm not sure why raspberries always seem so elusive. I spend a good deal of time driving around the city trying to buy them while they're around for those few short weeks. But when the result is a box of perfectly plump berries, all scarlet and bursting with flavour, the effort is so worth it.

This year, the raspberry gods were smiling down on me, and I managed to purchase a couple of litres of berries in early August. I immediately decided I wanted to make a pie, and the evidence of that is above.

Raspberry pie is probably my all-time favourite. My fondness likely stems back to my Grandma Pammett, who was an excellent pie baker. Butter tarts, icebox cookies and pies were some of her specialties, and I have lots of good memories of eating raspberry pies in her little dining room in the house on Bolivar Street. I have the same hutch from that room in my own dining room now, so I like to think there was a little familial continuity when I baked and served this pie many decades later.

I followed the filling recipe from Joy of Cooking, so if you're inclined, you can look it up. It calls for about 6 cups of fruit, some sugar to taste, zest of a lime or lemon and a bit of flour or cornstarch. In it goes to the pie crust, the recipe for which came from this book (sourced through a phone call to my mum, so more points for familial connections on that point). The recipe is fairly standard, but I will tell you the secret is to use all butter for the fat. It helps if the butter is frozen, because then it will grate perfectly into the flour. It makes for a very crisp and flaky pastry, which is really what you want in a pie.

You can see the result in the picture. It's far from perfect, and I'm sure Dorothy P wouldn't approve of my laziness in the basketweave top, nor in my haphazard crimping round the edges. But messy though it may be, there's no denying its tastiness. Shame I'll have to wait another year for the next one.

Monday, August 13, 2012

Coconut cake with berries and cream

Summer birthdays can pose a bit of a problem (says the one born in November). Not a problem when it comes to celebrating of course, but when it comes to cake. Summer temperatures, or the overbearing, shirt-soaking heat we've had this summer, can wreak havoc on iced birthday cakes. So what to do? Give up and skip dessert altogether? Don't be ridiculous! The answer is an easy, tasty cake you can serve cold.

This one fits the bill nicely. It's a coconut cake full of moist coconutty goodness. It's a variation on a tres leche cake, substituting in coconut milk for the evaporated milk. The end result is delicious and unlike anything I've had before. I made it for my brother's birthday at the cottage this year (as he's a fan of coconut). It was a hit with all the toddlers, middle-agers and seniors who present at the party.

Let's get started....
Mix up your cake batter, which is essentially a sponge cake. The difference is the coconut. The original recipe calls for 1/3 cup of unsweeted coconut, which wasn't enough, in my opinion. The second time I made this cake, I used sweetened coconut, and upped the quantity to 3/4 cup.


While the cake bakes, you get your 'milks' ready.


This is how the cake looks when it comes out of the oven.


Poke several holes in the cake before you pour over your milks, so the liquid can soak in. It might take a while, but eventually it'll seep in. Yum!


And here's the finished product. You can top with more whip cream if you like, but it's not necessary. Don't skip on the berries though -- raspberries and peaches are especially nice.

Coconut cake with berries and cream
From Martha Stewart Living
  • 1 stick unsalted butter, melted and cooled, plus more for pans
  • 6 large eggs, separated
  • 1/4 teaspoon baking soda
  • 1/4 teaspoon fine salt
  • 1 cup sugar
  • 1/3 cup flaked unsweetened coconut, toasted and finely ground
  • 1 cup all-purpose flour, divided
  • 2 cups heavy cream, divided
  • 1 can (13.75 ounces) unsweetened coconut milk
  • 1 can (14 ounces) sweetened condensed milk
  • 3 cups mixed fresh berries (about 12 ounces), for serving

Directions
  1. Preheat oven to 350 degrees. Generously butter a 9-by-13-inch glass baking pan. Whisk together egg whites, baking soda, and salt in a stand mixer fitted with whisk attachment on medium speed, until soft peaks form, 4 to 5 minutes.
  2. Add egg yolks to egg-white mixture, and whisk until completely combined. Gradually add sugar, and whisk until combined. Fold in butter and coconut with a rubber spatula.
  3. Sift 1/4 cup flour onto mixture; fold to combine. Repeat with remaining flour, folding in 1/4 cup at a time. Pour batter into pan; bake until golden and a toothpick inserted into the center comes out clean, 20 to 25 minutes.
  4. Meanwhile, whisk together 1 cup heavy cream, the coconut milk, and condensed milk. As soon as cake is removed from oven, pour cream mixture over cake. Let cake cool completely in pan on a wire rack. Cover cake with plastic wrap, and refrigerator at least 5 hours and up to 8 hours.
  5. Just before serving, whisk remaining cup heavy cream until soft peaks form, and spread over cake. Serve with mixed berries.

Sunday, August 5, 2012

Summer salads

Summer's such a great time for salads. They're an ideal way to use a variety of produce, and if you make big batches, they make for an easy lunch or supper without having to turn on the stove. These are two recipes I made for the first time this year. Both are tasty, and both have made repeat turns in my kitchen over the last few weeks. And not surprisingly, both come courtesy of Jaime Oliver.

First up is a great pasta salad. The basic recipe is fantastic, but I modified it a little to add some protein in the form of beans and lentils. This makes a quick lunch for a number of days running.
One fun thing about this salad is the dressing. While the pasta's cooking (and the lentils in my case), you add in three cloves of garlic into the water during the last few minutes. This softens the garlic a little, so you can mash it up in your mortar and pestle to serve as a base for your dressing. It's fun to do and gets out some aggressions along the way.


With the dressing out of the way, next up is the chopping. It takes a little time, so make sure you have a good podcast on in the background (my latest faves are Here's the Thing, with Alec Baldwin and WTF with Marc Maron).

This last photo is particularly terrible, but the lighting wasn't cooperating with me for the shoot. Trust me that the final product is prettier than this.


And here's an only slightly better shot of the other salad, a great combination of beet and green apple. Toss in a little mint or basil, dress lightly with lime juice, olive oil and some salt and pepper, and you've got yourself a winner. This one was a hit with my niece recently, especially after I told her eating it would turn her pee pink.


Best Pasta Salad
adapted from jamieoliver.com and itaintmeatbabe.com

1 cup dried lentils (I like lentils du puy)
1/2 cup cooked or canned black beans (or beans of your choice)
11 oz small shells pasta
3 fairly small cloves of garlic still in their skins
1 1/2 cups yellow cherry tomatoes, quartered
1 1/2 cups red cherry tomatoes, quartered
1/2 an english cucumber, chopped, or several Lebanese cukes
1/4 cup pitted black olives, chopped
2 tbsp fresh chives, chopped
1/4 cup lightly packed fresh basil, chopped
4 tbsp white wine vinegar
7 tbsp olive oil
salt and pepper to taste

Boil 3 cups of lightly salted water and add the dry lentils. Cook until they are tender, approximately 15 minutes. Drain and set aside.

In a larger pot of salted water, boil pasta and whole cloves of garlic until the pasta is al dente, approximately 5 minutes. Drain pasta and set garlic aside to cool. You want your garlic to be smushy. If you can't squeeze it out of its skin, then you'll need to boil it for a little longer.
Combine tomatoes, cucumber, herbs, and olives in a large bowl and add cooled pasta and lentils. Uniformity is crucial to make this salad work well, so ensure that all your vegetables are chopped to similar sizes. Using the size of the pieces of pasta is a good guide.

Using a mortar and pestle or some other kind of mashing apparatus, smush the boiled garlic into a paste. Then add vinegar and olive oil. You can season this dressing with salt and pepper if you are feeling brave, or you can wait until the whole salad is mixed and season it to taste then.
Mix the dressing in with all the other ingredients. Season accordingly and chill in the fridge for half an hour or so before serving.
Jamie says the salad serves four, but this makes a LOT, so I would guess it would serve six or so as main and many more as a side dish.

Beet and apple salad
Adapted from Jaime Magazine

There's a full recipe for this in a recent issue of Jamie's magazine that also calls for the inclusion of red cabbage. I left out the cabbage and it's still pretty great. This is my rendition of the salad from memory, but it's incredibly adaptable.

2 beets, raw, peeled and/or scrubbed *up quantities if you need to make more
1-2 Granny Smith apples, depending on your preference
handful of mint leaves or basil leaves finely chopped
juice of half-whole lime
drizzle of olive oil
salt and pepper to taste

Scrub your beets and remove root and topper. Depending on how clean they are, and how thick the skin is, you may choose to peel these. Slice them up and cut into matchstick pieces. If you'd rather grate these in the food processor, or by hand, feel free.

Do the same with the apples, minus the peeling step. Drop into a bowl, and scatter over your mint or basil leaves (or you could use a combination). Drizzle over the oil to taste, the lime and seasoning. Mix together with your fingers, which will no doubt be stained pink from your beet chopping.
The apples soon turn pink on account of the beets, but that's part of the charm. This is very good at room temperature, but even better cold from the fridge.

Sunday, July 22, 2012

Pina colada pops


I'm parched! That's what my lawn would say if it could talk. That's it above. That straw-like mass of deadness, void of any colour except for the few weeds and shoots from my tree that surely would withstand the apocalypse.

So it's very dry and very hot here in Ottawa, as it has been for much of the country. I'm not alone in suffering with thirsty lawns and brittle plants, but I bet I am unique in my cool down recipe presented for you here.

Do you like pina coladas? Do you like getting caught in the rain? Nevermind. If your answer to the first question was yes, then I'll be you'll love a pina colada frozen in a handy popsicle form. These are a breeze to throw together and fun to have on hand in your freezer.
A quick segue first though: I'm a fan of the pina colada, I must admit. But they're something I only associate with being on vacation, and I don't think I've ever had one in Canada. To me, they're a drink best enjoyed lounging on a beach or by a pool while lounging under the Caribbean sun.

Having said that, the best pina colada I ever had wasn't served near a beach at all. It was in the hills outside Havana, Cuba at a pit stop travelling from Varadero into the capital. Mid-way through the four-hour trip, our van pulled into this rather ramshackle cafe/gas station/bar so we could all get out and stretch our legs and use the toilets (after paying for square of toilet paper). The bus driver encouraged us to get a pina colada while we were there, and our arms didn't need much twisting at all. We lined up and the staff behind the bar got to work cutting meat from fresh coconuts and adding it to a blender with fresh pineapple and a generous amount of rum. After a few minutes in the blender with some ice, out came a thick, rich drink, so substantial the straw stood upright on its own. It was very much like drinking a coconut milkshake, and we happly slurrped and gobbled down every last bit, while sitting on the patio, overlooking the fields of agave and enjoying some Cuban music.

These pops aren't quite the same, but they do evoke a nice memory.


Start by roughly chopping fresh pineapple and throwing it in your blender. I used almost a whole fresh pineapple (bought peeled and cored) to get the 3 cups needed. Add in your water, sugar (I used honey instead), water and RUM. That's right -- these pops have booze in them. So good.


Whiz everything up and then strain through a fine sieve so the resulting pops will be clear. This step takes some time, but it's worth it.
Pour into the popsicle moulds and let freeze. These took just a few hours because they're so small.


And your patience will be rewarded with this: a frozen rendition of a tropical treat.


Piña Colada Ice Pops

makes 7-8 pops
recipe from Gourmet Magazine and found on Shutterbean.com
  • 3 cups chopped fresh pineapple (14 ounces)
  • 1/3 cup well-stirred canned unsweetened coconut milk
  • 1/2 cup water
  • 3 tablespoons superfine granulated sugar
  • 1/3 cup light rum
Purée all ingredients in a blender until smooth, then strain through a fine-mesh sieve into a large measuring cup, pressing on and then discarding solids. Pour into molds. Freeze 30 minutes. Insert sticks, then freeze until firm.

Monday, July 2, 2012

Strawberries and cream bars


Strawberry season started several weeks ago and I've been doing my best to enjoy as many of them as possible. I served some for a recent book club, which fell during the June heatwave. I thought a frozen dessert might keep us cool in the midst of our heated debate.


Strawberries and cream bars
From Martha Stewart's Everyday Food   
    • 2 pounds strawberries, hulled, halved if large (6 cups)
    • 1 1/2 cups sugar
    • Coarse salt
    • 7 large egg whites
    • 2/3 cup cold heavy cream
    • 1 teaspoon pure vanilla extract
Directions

1.     In a blender, combine strawberries, 3/4 cup sugar, and pinch of salt and puree until smooth. Pour into a 9-by-13-inch baking dish. Transfer to freezer and scrape with a fork every 30 minutes until mixture is thick and slushy, 2 hours. Smooth top with a rubber spatula.
2.     In a large bowl, using an electric mixer, beat egg whites on high until foamy. With mixer on medium, gradually add 3/4 cup sugar. Increase speed to high and beat until stiff, glossy peaks form, 3 minutes. In another medium bowl, beat cream and vanilla on high until stiff peaks form, 1 to 2 minutes. With rubber spatula, gently fold whipped cream into egg-white mixture. Pour over strawberry mixture and smooth top with rubber spatula. Freeze until firm, about 4 hours (covered, up to 3 days), before cutting into 12 squares.

Note: I halved this recipe.


Wednesday, April 11, 2012

Hot cross buns

Easter weekend was fairly spring-like in O-town. The weather certainly wasn't as warm as our pre-taste of summer from a few weeks ago, but there was still enough sun to coax us outside.

We headed to the Experimental Farm for a walk about on Sunday. The parking lot was teeming with mini-vans full of families there to see the new lambs and baby calves inside the barn. But we stuck to the gardens, where not much was in bloom, but we entertained ourselves spotting the new green shoots on the lilac trees, and the yellow daffodils emerging from the dirt.

Below, my extremely un-horiticultural report of some of the things we saw.


Some pink magnolia (?) ready to bloom.

Bright yellow branches.


Teeny leaves ready to pop. (I'd better prepare to for the onslaugh of offers to write for gardening magazines after those descriptions!)


Before we set out on our walk, we fuelled up on a lunch of hot cross buns. Why lunch, you ask? I had initially planned to have the buns for breakfast, and in fact prepared Nigella's recipe the night before, leaving it in the fridge overnight to rise. When I got up Sunday morning, eagerly hoping to find a bowl of fluffly, fruit-studded dough to greet me, what I instead discovered was a hard lump of dough no bigger than when I left it the night before. Nigella Easter fail!


So, Jamie Oliver to the rescue. This recipe is from his magazine, published at Easter last year. It was quick to pull together, and most importantly, resulted in some buns we could actually eat. They were delicious warm from the oven, and nice the next day as well, toasted and spread with butter. I used dried fruit I had on hand, which included a mix of raisins, cranberries and candied ginger.


Hot cross buns
From Jamie Magazine

• 50g sugar
• 7g sachet dried yeast
• 450g flour
• 2 tsp mixed spice
• 100g mixed dried fruit (currants, sour cherries, sultanas)
• 25g chopped mixed peel
• Zest of 1 orange
• 1 egg, beaten
• 50g butter, melted
• 50ml milk, warmed

Decoration
• 100g flour mixed with about 50ml water to make a dough, or 100g readymade shortcrust pastry

Sticky glaze
• 2 tbsp sugar
• Juice of 1 orange
• 1 egg, beaten

1. Mix 1 teaspoon of the sugar with the yeast and 150ml tepid water in a jug until frothy.

2. Sift the flour, 1 teaspoon of salt and the mixed spice into a large bowl, then add the dried fruit, peel, orange zest and remaining sugar. Make a well in the middle and pour in the yeast mixture, then add the beaten egg, melted butter and 40ml warmed milk. Using a fork or wooden spoon, stir in a circular motion until you have a dough. Add a little more milk if the dough is too dry.

3. Place the dough on a clean surface dusted with flour and knead until it is smooth and glossy, about 5 minutes. Place the dough in a large mixing bowl and cover with a clean, damp tea towel. Leave in a warm place to prove until it has doubled in size, about 1 hour, then knock it back and knead again to its original size. Divide the dough into 12 evenly sized pieces and shape into round buns. Place on a lightly greased baking tray, spaced well apart. Cover with a damp tea towel and leave to rise again until doubled in size, about 35–40 minutes.

4. Meanwhile, preheat the oven to 220C/gas 7. For the decoration, place the dough or shortcrust pastry on a clean surface dusted with flour and roll into a sausage about 1cm thick. Cut the sausage in half, and cut each half into 6 pieces. Roll out each piece again to make 2 thinner, 5mm strips of about 8cm long. You should have 24 strips in total. Brush the risen buns with the beaten egg and lay the dough strips on top in the shape of a cross. Brush with the beaten egg and bake for 15 minutes, or until golden.

5. Meanwhile for the glaze, place the sugar and juice in a pan and gently heat until the sugar is dissolved and the syrup is bubbling.

6. Brush the buns with the glaze and eat immediately, or cool and serve toasted.