Wednesday, April 27, 2011

Roasted shoulder of lamb for Easter

I hosted my parents for Easter this year, and in between doing several chores around the house (thanks, Dad!) and avoiding some nasty winter-ish weather, we ate pretty well.

I had in my mind that I wanted to serve up lamb for Sunday dinner, and naturally went first to Jamie Oliver to see what he suggested. I landed on his recipe for roasted shoulder of lamb, and immediately started to drool over his descriptions of flavourful meat that fell off the bone after four hours in a low oven. I happened to catch an episode of Jamie at Home earlier in the week, and we watched it on Friday evening, our mouths watering as Jamie demonstrated how an economical cut of meat (his term) could be transformed with slow, even cooking. We were sold and a menu of lamb was set.

Then came the difficult task of actually finding a lamb shoulder to cook. No luck at Farm Boy, or a butcher shop in the market. I asked my mum to try the butcher's in Lakefield (who were open on Good Friday -- heathens!), and nothing there either. Same result at Ralph's butcher shop in Norwood too.

I was worried we might have to resort to a lamb leg and admit defeat.

But I decided to give one last try on Saturday morning and we hit the jackpot at a very busy Glebe Meat Market. There were several shoulders to choose from, and the butcher offered to slice and dice it any way we wanted. We ended up with about a five pound roast, mostly shoulder with a few ribs attached. Off to the cash register where I forked over $36 for our little beauty. What was that you said about an economical cut, Jamie?? I supposed if you're a gazillionaire like our friend the Naked Chef, this isn't much money to spend on dinner. And it was a treat, I told myself, while silently cursing the lamb and muttering he'd better be worth it.

And worth it he (she?) was! This lamb was probably the most delicious I've ever had, if I do say so modestly and unashamedly. The best part is that's it was super simple to prepare with incredibly outstanding results.


Here's the roast before it went in the oven, covered in rosemary and garlic and lying in my new roasting pan, that I christened for the event. The pan was so massive that it didn't quite fit in my teeny tiny oven, and had to go in on an angle in order for the door to close.

And about four hours later, it came out looking like this. The bones fell right out and we could pull apart the meat with forks. So, so good.

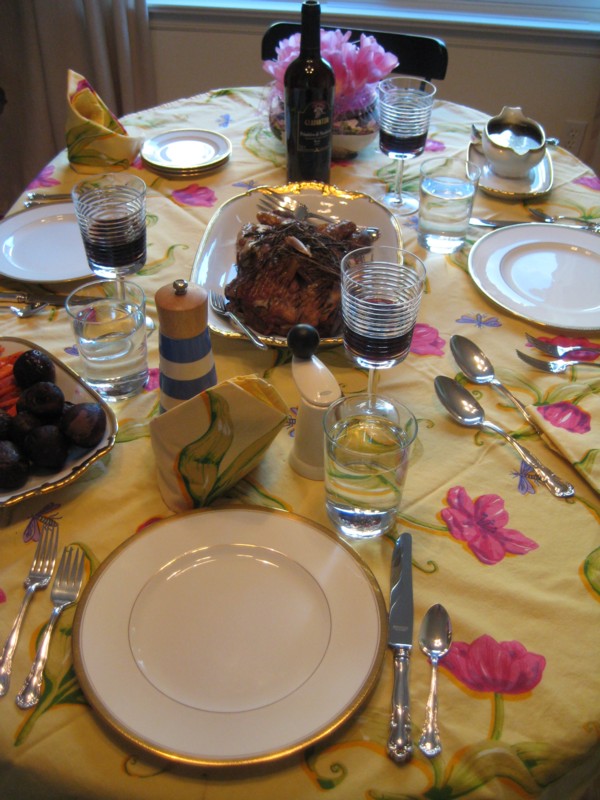
Here's what the table looked like with good china and cutlery. Not baa-ad for a holiday meal, huh?

Increcible roasted shoulder of lamb
From Jamie at Home

• a large bunch of fresh rosemary
• 1 x 2kg shoulder of lamb
• olive oil
• sea salt and freshly ground black pepper
• 1 bulb of garlic, unpeeled, broken into cloves

Preheat your oven to full whack. Slash the fat side of the lamb all over with a sharp knife. Lay half the sprigs of rosemary and half the garlic cloves on the bottom of a high-sided roasting tray, rub the lamb all over with olive oil and season with salt and pepper. Place it in the tray on top of the rosemary and garlic, and put the rest of the rosemary and garlic on top of the lamb. Tightly cover the tray with tinfoil and place in the oven. Turn the oven down immediately to 170°C/325°F/gas 3 and cook for 4 hours – it’s done if you can pull the meat apart easily with two forks.

Thursday, April 14, 2011

Baked kale chips

Back in the dark ages when I earned my keep as a babysitter, I used to sit for one family who were more than a bit on the crunchy granoloa side of things. On my first night on the job, I had the typical tour of the house and learned about emergency phone protocols, bedtime routines and the like. When the tour landed in the kitchen, the mom turned the discussion to snacks.

"The kids can have some chips and juice before bed," she said, pulling a box of corn flakes from the cupboard. "The juice is in the fridge and the cups are above the sink."

"Great," I said. "And where are the chips?"

"Here," she said, pointing to the corn flakes. "We put them in a bowl and tell the kids they're chips. Clever, huh?"

Seriously? I was so flabbergasted I wasn't quite sure what to say, but I knew for sure those kids were getting a raw deal. I completely understand not wanting to feed your kids chips, but if that's how you feel, then don't sugar coat -- or in this case, corn coat -- the situation and pass off one food for another. What about popcorn as a snack? It's not that unhealthy, and at least it's a legitimate snack food and not a breakfast cereal posing as a latenight treat. Can you imagine how peeved those kids must have been when they actually experienced real chips for the first time? Talk about setting up your children not to trust you about anything!

I was reminded of that chip anecdote when I made these kale chips last week. If you read food blogs as I do, then you'll know that baked kale was all the foodie rage a while ago. Everyone was raving about its greatness, and it turns out, it was warranted praise. These chips really do bake into crisp, salty chips that you feel almost guilty snacking on. Now you're never going to be fooled into thinking they're potato chips, but with the crispy texture and salty kick, they are quite tasty. Think more of a seaweedy flavour rather than starch (and I mean that in a good way). Apart from the salt and a trace amount of oil, these chips are good for you too. Why not get some vitamin A and C the next time you snuggle in to watch a movie and fancy a snack?


Here's how the chips look pre-baking, all glisteny with oily goodness. I think you could experiment with different flavoured oils for a slightly different taste.

And after a while in the oven, they come out dehydrated and super crisp. Perhaps not the most attractive snack food you've ever seen, but believe me, they are good. And the bonus is they stayed crispy, covered and uncovered, for several days after they were baked. The chips are pretty fragile once they're baked, so you have to handle them delicately. One recipe I saw suggested crunching up the chips and adding to popcorn. It's a total doubling up of snack foods, but what's wrong with that?


Baked Kale Chips
Adapted from a bunch of inspiring places and found here

1 bunch (about 6 ounces) kale (I used curly kale, but any kind will do. Apparently chard and other greens work well too.)
1 tablespoon olive oil (or enough to coat your leaves lightly)
Sea salt, to taste

Preheat oven to 300°F. Rinse and dry the kale, then remove the stems and tough center ribs. Cut into large pieces, toss with olive oil in a bowl then sprinkle with salt. Arrange leaves in a single layer on a large baking sheet, lined with parchment paper. Bake for 20 minutes, or until crisp. Place baking sheet on a rack to cool.

Sunday, April 3, 2011

Chickpea burgers

It's almost barbecue season! This weekend was the first real spring-like taste we've had so far in 2011. The snow is slowly retreating from my backyard, revealing some pretty nasty looking grass. I hope the lawn elves come by soon to rake everything up. But since it'll be several weeks before I actually haul my barbecue out of the garage and fire it up, I thought I would give these burgers a try. In truth, I wanted to make something with chickpeas again and this seemed like a nice compromise. As far as veggie burgers go, these ones are okay, but didn't knock my socks off. They're nicely spiced, but if I were to make them again, I'd increse the amount of spices and garlic. I also found them a bit too sweet with the carrot and red pepper. Maybe a little grated horseradish would provide a much-needed kick? Anyway, start by blending up the chickpeas, pepper and carrots in the food processor. You'll likely have to scrape down the sides several times to get everything the same consistency.
Blend until you end up with something like this. The result was much redder than I had anticipated, due to the pepper and carrot.
Then scrape the puree into a bowl and add in the oninons you sauteed earlier. The recipe says specifically not to brown them, so kindly ignore the brown flecks on mine. Note the spices in the right hand corner. Also, I didn't have bread crumbs, so I substituted in oats, the quick cooking kind. Oh, and you'll have to imagine half a cup of parsley, because I didn't have any of that either.
Shape into patties and set to bake on a pan drizzled with olive oil. The recipe says to make 10-12 patties, but I settled on seven. If you did go for a dozen, the burgers would be more slider size than a regular patty.
And here's what the final product looks like. I had to cook them a bit longer than stated, and I flipped them over part way through to get even browning on both sides. I didn't eat these burger style (e.g. on a bun with fixings) but you definitely could. For the leftovers, I'm going to whip up some kind of yogurt sauce for these. They need a little "something".
Chickpea burgers Adapted from The Three Greek Sisters and as seen on Cityline Preheat oven to 400F Makes 10-12 patties 2 tssp olive oil 1 yellow onion, diced 2 cups chickpeas, cooked 1 red pepper, deseeded and quartered 2 cloves garlic, sliced 1 carrot, chopped 1 1/4 cups fresh breadcrumbs 1 tsp salt 1/2 tsp cumin, group 1/4 tsp corriander, ground 1/2 cup fresh parsley, minced olive oil for coating 1) Heat the olive oil in a small sauté pan over medium heat. Add the onions and sauté until soft, about 5 minutes. Transfer to a large bowl and let cool. 2) Place the chickpeas, red pepper, garlic, and carrot in a food processor and pulse until all of the ingredients are blended. Transfer to the large bowl with the onions. Add the remaining ingredients to the bowl and use your hands to combine the ingredients. 3) Shape the mixture into patties and use a brush to lightly grease both sides of the patties with olive oil. 4) Transfer the patties to a baking sheet and place in the middle of a preheated oven for 20 minutes or until the patties are golden-brown on both sides. 5) Use a spatula to remove the patties from the baking sheet. Serve on a bun with your favourite garnishes: pickles, tomatoes, lettuce, red onions, the possibilities are endless! NOTE … The chickpea mixture can be prepared on the morning of serving day and stored in the refrigerator until ready to shape into patties.